Sunday, February 28, 2021

Share It Sunday Blog Hop-CASEing Myself


Hey Y'all!

For my contribution to our Share It Sunday hop, I wanted to share this wedding card I made. For the layout,  I decided to CASE one of my most favorite cards I ever made.  I joined Stampin' Up! in October 2016, and started blogging in August 2017, almost a year after I had joined. It's fun to go back and see those early projects, let's just say "You've come a long way, baby!"


This is the original card I wanted to CASE, you can see the blog post here. If I remember correctly, I CASE'd this card from Elizabeth Hill Rush, a fellow demonstrator. CASE is an acronym that means "Copy And Share Everything" or "Copy And Selectively Edit."


I chose the Hydrangea Haven stamp set and Hydrangea Hill DSP, which, in my opinion, is the most beautiful in the J-J Mini. My sentiment came from the Happy Thoughts stamp set.  I started with a Highland Heather card base, then added a Purple Posy layer randomly stamped with the large Hydrangea stamp in Highland Heather, then embossed with the Pinewood Planks Embossing Folder.


 I embossed the Hydrangea with white embossing powder onto a piece of the DSP, and layered it onto a piece of Basic White die cut with a Stitched So Sweetly dies.  I used the Lovely Labels Pick a Punch to create the label for my sentiment. 


For the inside of my card, I used Stampin' Write markers to ink up the Hydrangea.  I die cut a piece of Highland Heather with that same Stitched So Sweetly die, cut it in 1/2, added a strip of DSP, and then placed Tear and Tape along 3 sides, leaving the top open creating a gift card holder.


It is so simple to make any card a gift card holder, just by adding a strip of cardstock along the bottom of the inside of the card.
Thank you for stopping by today, now see what everyone else has created!


Today is the very last day to take advantage of Saleabration and receive free product with every $50 or $100 purchase.  If you would like to order any of the products I've used, simply click on the images below to go to my online store. Make sure you are subscribed to my blog, I love sharing my love of crafting with you!
Love,
Nina

Saturday, February 27, 2021

My Organized Craft Room!


 Hey Y’all!

I have been a busy girl! I have been working on getting some organizing done in my craft room, so it will be a "craft" room and not what it has been...a "crap" room lol! I just wanted to share what I have accomplished in the past couple of weeks, and hopefully give you some organization inspiration. If you know me, you are probably falling out of your chair laughing at that!


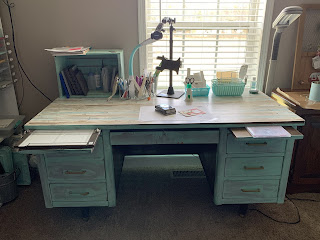
My husband gave me the cabinets and counter top a couple of years ago for Christmas.  I purchased the top cabinets from Home Depot, they are actually pre-fab cabinets made to go in the bathroom, but 3 of them worked perfectly over the counter space.


I adhered magnetic sheets (inexpensive vent covers found in home improvement stores) to the inside of the cabinet doors for dies that I use frequently.


I have had this old teacher's desk for awhile, I think I paid $30 for it, I painted it and added contact paper to the top.


One of the drawers contains ribbon and embellishments.


Another drawer contains punches.  


The tall drawer contains my card stock, the regular colors are in the front and the In-colors are in the back. I have them in file folders, and keep the scraps in the folders as well. 


My friend Vivian gave me ideas on what to do in my space, and the open bookshelves were one of her suggestions. By the way, she says when she retires from teaching she is going to start her own organization business, and she really needs to! I already had the white one, and black was all they had in stock.  I knew I wasn't going to be on the cover of a magazine, so I was ok that one didn't match.


I splurged and bought the new style ink pads in all of the colors.  I had a mix of the old and new style, and had a few pieces of the storage.  I am so happy with how all of it looks! It will ALWAYS be a work in progress, but I know I have felt so creative since it isn't so cluttered and junky. I didn't take before pictures...I was scared y'all would nominate me for an episode of hoarders lol! So if I can do this, anybody can!
So what are your best organization tips? Let me know in the comments!  
Thanks for stopping by, I have the Stampin' Up! ink and marker storage products listed below, just click on the image to go to my online store.
Love,
Nina


Product List 

Tuesday, February 23, 2021

Note Card Holder & The Saleabration Continues Class

Hey Y'all!

Here are the instructions for the note card holder I shared the other day.  If you missed that post with all of the cards inside, you can view it here.

This would make a great gift, in fact, I made this one for my mom.


It can hold up to 6 notecards and envelopes, 3 on each side.

Here are the instructions to make the holder:
  • Cardstock: 7-1/2 x 8-1/4
  • Score the long side at 3-7/8 and 4-3/8
  • Score the short side at 5-1/4 x 5-1/2
  • 2 side pieces 1-1/4 x 2
  • Score these on the 2' side at 1/2 and 3/4


Mark 1" out from each vertical score line in the center.  Draw a diagonal line from this mark up to the top score line on each side.  Cut out entire triangular section.


Fold the side tabs and adhere them to the outside bottom edge.  Fold up the bottom flaps and adhere to form a pocket. When the holder is folded, these should line up on the sides.


Decorate and embellish as desired.  For this project, my DSP measured 3-3/4 x 5-1/8, and my ribbon was about 24".
I am offering this as a class Saturday March 13.  Saleabration was just too short, and there was so much going on in my life.  Everyone who attends will be entered into a drawing to win the Punch Party stamp set and other prizes.  The class will be $20 for the notecard holder and 6 cards.  I will also offer this as a Class to Go.  That option will be $15 for the class plus $8 shipping.  You will receive 6 notecards and envelopes, 6 6x6 pieces of DSP, Basic White for stamping, ribbon, and the holder template scored.  You will be responsible for cutting, punching, and stamping the cards. 
Deadline to sign up is Thursday February 25.  I plan to use the same DSP used here, but it is only while supplies last, so I can't guarantee it.
Click here to sign up.
If you just absolutely love the items I used and don't want to wait for the class, you can earn the DSP free with a $50 order and the Host exclusive Stamp Set with a $300 order during Saleabration, which ends February 28.
Thanks for stopping by!
Love,
Nina


Product List