Showing posts with label Gift Tags. Show all posts

Friday, November 5, 2021

Make Your Own Gift Wrap! Packaging Blog Hop


Hey Y'all!
Today, the Crafty Collaborators are sharing packaging ideas. I fell in love with Stampin' Up! for this very reason...I love to make my own tags, and dress up a gift. We sell several packaging products such as boxes and bags, but today, I wanted to show you an idea that I have always loved, and is a great project to involve the kids....making your own gift wrap!

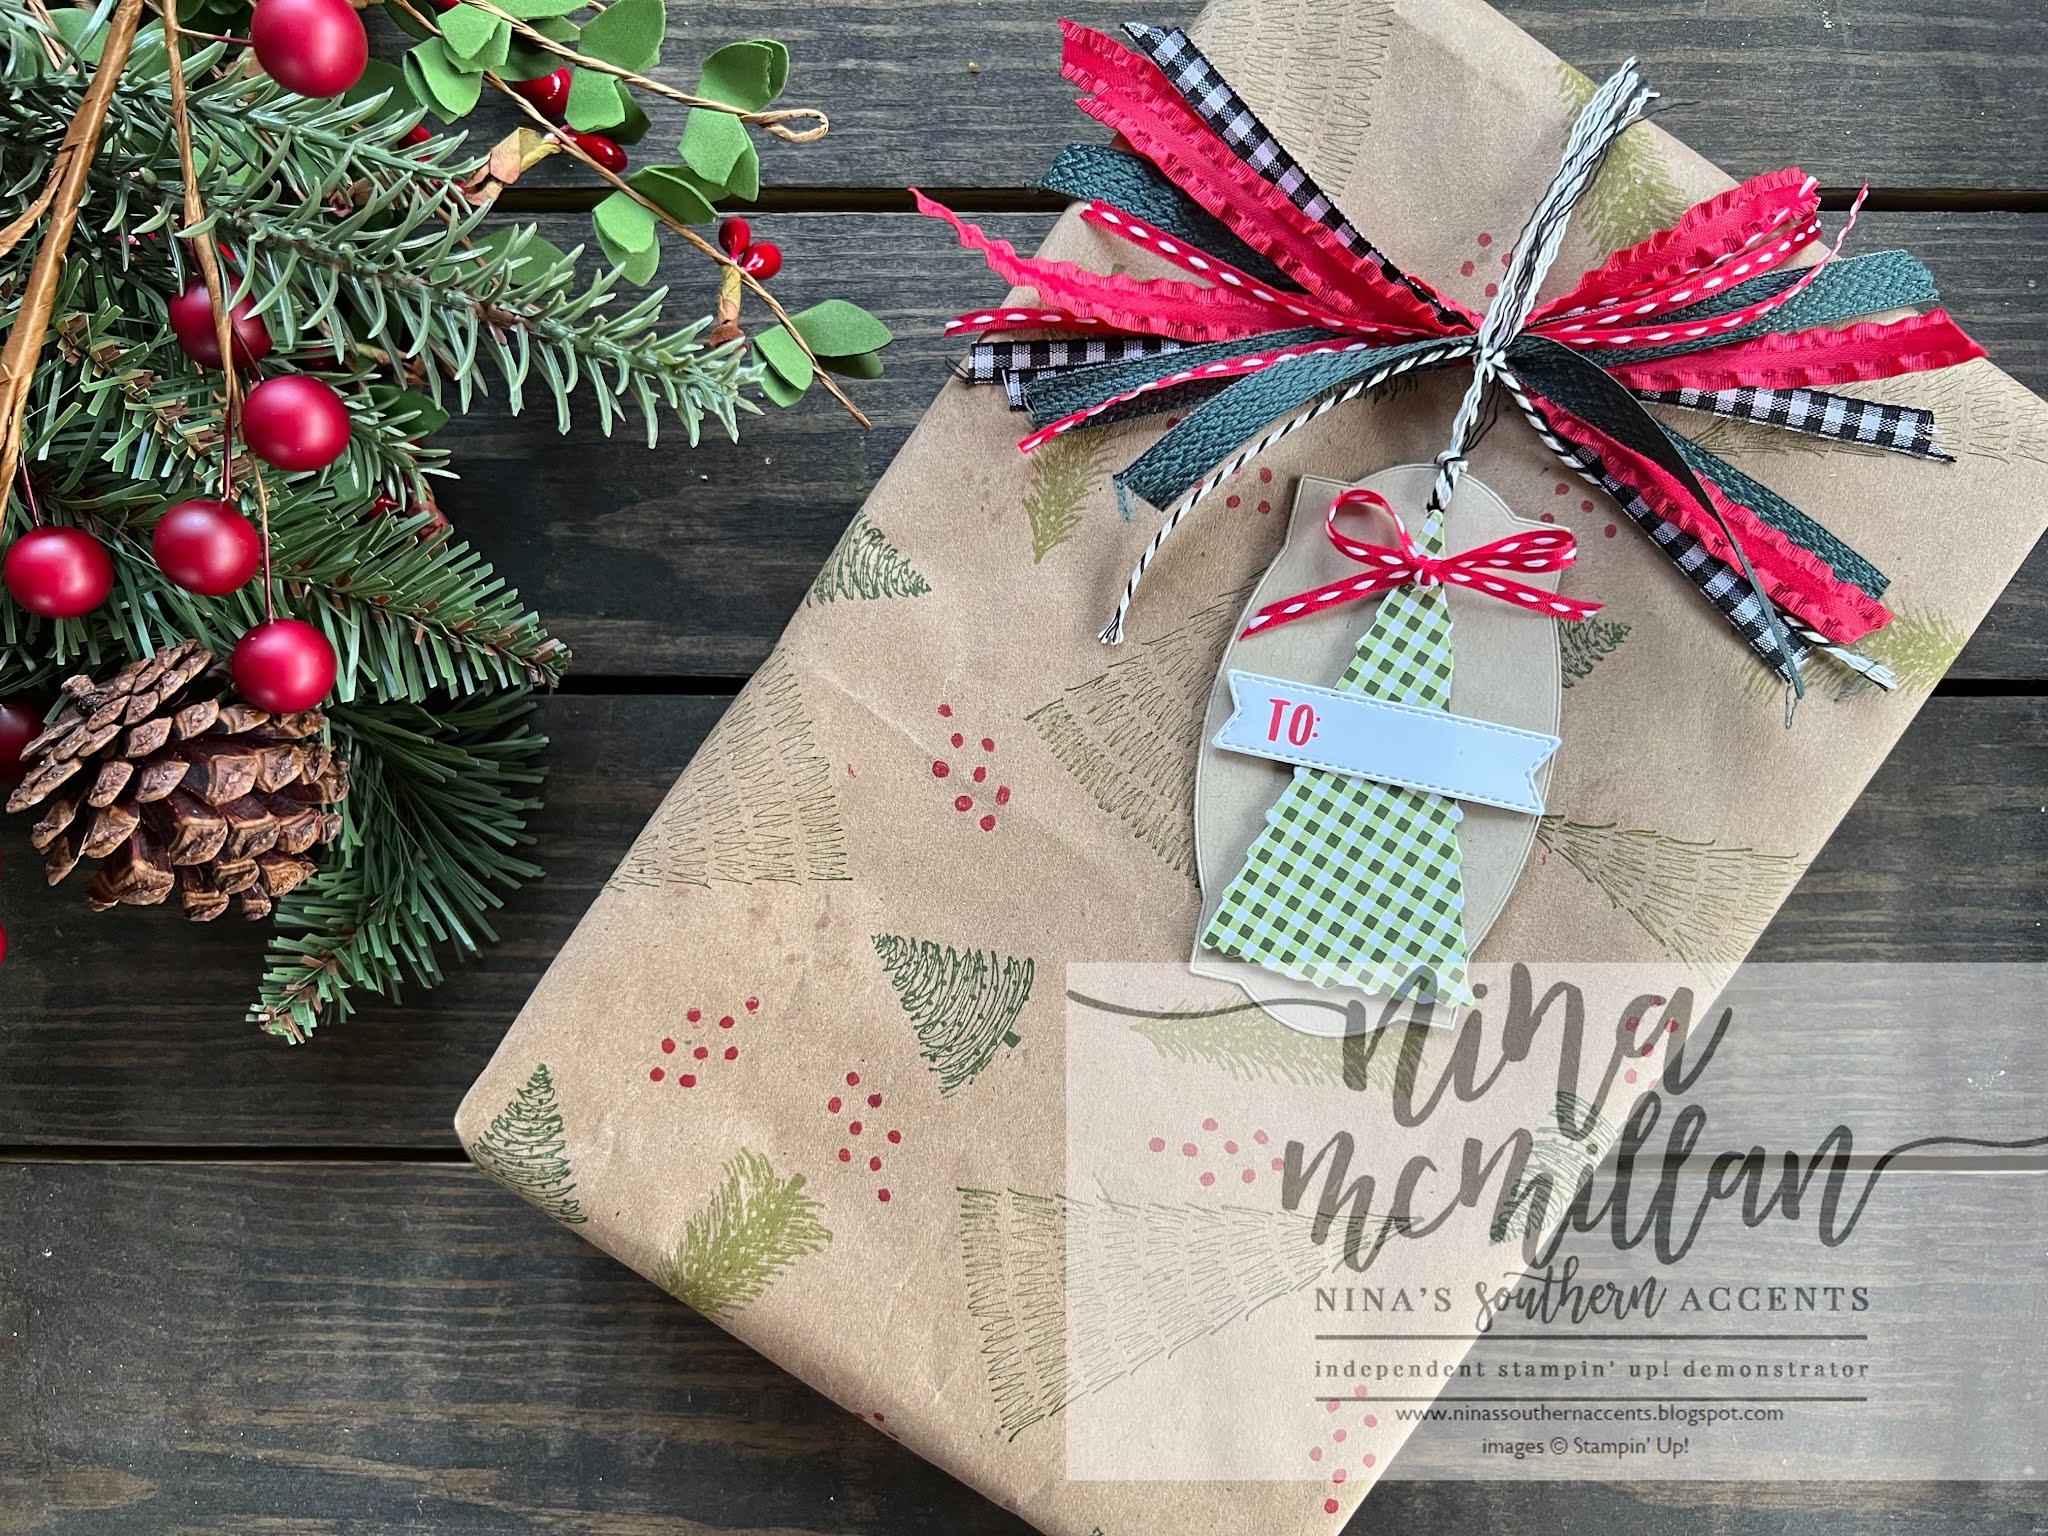
Brown paper packages tied up with strings....these are a few of my favorite things! I love the look of presents wrapped with kraft paper....I've used a roll of kraft paper I had on hand, you can purchase this at most any box store. I stamped the tree images in different greens all over the paper, and added the red dots.


Here is a close up view of the stamped images.


I uses the Tasteful Labels dies to create this tag, and added a tree cropped from DSP. I stamped the "To:" using the To/From stamp from Banner Year (a great stamp set for many occasions!) I don't know about y'all, but it seems like I hoard my ribbon and have lots left over when it retires! So I created this bow using several different ribbons...I cut 3 strips of each ribbon, layered them, and then tied them together in the middle with a piece of twine. 
Oh, and you will never guess what I wrapped....a Paper Pumpkin Box!

They make great gift boxes and can hold lots of goodies! I can see gifting some Christmas socks, gloves, a hat or scarf in one of these, or, if you have friends that love to craft, a stamp set, some ink and paper, even a crafting kit with bone folder, snips, and adhesive.
Not a Paper Pumpkin subscriber? This is the preview of November's kit, you have until November 10 to subscribe. It really is a party in a box!


Now it's time to get more packaging ideas from my Crafty Collaborators friends! Make sure to visit them all, I know you will love all the projects!


If you would like to order any of the products used, click on the Products Images to go to my online store. Be sure to use the Current Host Code to earn free product from me! 


If you've ever thought about being a Stampin' Up! Demonstrator, as a business or just a happy shopper with a discount, now is a GREAT time to join. The Starter Kit, normally $99, is just $75! That is $125 of product plus FREE SHIPPING for only $75. And there is no risk, even if you choose to never order anything again, you get $125 in product for only $75. 
WHAT ARE YOU WAITING FOR! 


Click here to join my team! I would love for you to be a member of my Southern Accents Stampin' Squad, and no! you don't have to have a Southern Accent lol!

Preorder the beautiful Eden's Garden Suite!  Click on the image to go to my online store.


free gift with any product purchase in november
Everyone who purchases from me in November will receive a pack of the gorgeous Gold & Rose Gold 6x6 Metallic Specialty Paper (AC pg 135) as my thank you to you!

Thanks for stopping by today, go make something beautiful!
Love,
Nina


Thursday, September 10, 2020

Gift Wrapping Southern Style

Hey Y'all!
One thing I love about gift giving is the presentation...I want my present to be the prettiest one on the table!  I titled this post "Gift Wrapping Southern Style" because nothing says Southern to me more than red gingham and sunflowers.  

For this gift of kitchen essentials, I made a wrap by cutting the bottom off of a brown paper lunch bag, then cutting it down the middle.  


Then I used the Celebrate Sunflowers stamp set and stamped the sunflower and leaves in a random pattern all over the bag. To add more to the shabby chic look, I used a journaling pen to add black "stitching" to the edge of the bag, and also to highlight the stitching on the tag. I wadded up the bag, then smoothed it back out to give more texture.


For the tag, I used my favorite set of dies, the Stitched So Sweetly dies and the Toile Tidings DSP that I am SO GLAD returned in this year's Holiday Mini Catalog!  I inked the small sunflower in Bumblebee, and used a sponge dauber to add the Mossy Meadow to the leaves.  Raffia and a silk flower attached with hot glue "wrapped it up." 
If you will notice, there is a brand new product listed in the product list below....The Stampin' Cut and Emboss is available to customers!  I love mine!  You can pay full price, or you can get it for $99 and free shipping if you sign up as a demonstrator.  AND the month of September, Stampin' Up! is offering even more than the usual $125 for $99.  You get 2 extra stamp sets plus rhinestone embellishments, and enough precut card kits to make 16 cards, in a class if you choose to.


 So you can be a "kit-napper"-get the deal one time and never order again, be a "happy shopper" -buy from yourself at a discount, or share the love and build a business.  I would love for you to join my SASS squad, contact me if you have any questions-ninamac32@hotmail.com. To join, just click "Join The Fun" at the top of the page.
If you would like to order any of the products I've used, simply click on the images below to go to my online store. Thanks for stopping by, see you next time!
Love,
Nina


Product List

Friday, September 6, 2019

Bird Ballad Gift Tags

Hey Y’all!
I love giving gifts! And that’s kind of funny, because if you’ve ever heard of the 5 Love Languages by Dr. Gary Chapman, “Gifts” aren’t my primary love language.  Coffee, yes, absolutely coffee is my love language😂. But I digress...
I’ve shared many times that the thing I love most about Stampin’ Up! are the cute ways you can package gifts and treats. And so I wanted to share these gift tags I whipped out in less than hour. Truth be told it will take longer to write this blog post than it did to make the 5 tags!
The Stitched Nested Label dies make perfect tags, and I embellished them with the bird image from Free As A Bird, and then a Stitched Shape circle stamped with the For You sentiment from Let It Ride. 
If you are a horse lover, you need that set in your life! It’s got some great sentiments as well, and I love the font.

Just a touch of color was added to the birds with watercolor pencils. The hardest part about making these? Fussy cutting those birds! But it’s all good. They are going to be tied to some mini Cream Cheese pound cakes. The tags will make them even yummier😊
Tips and Tricks:
  • Fussy-cutting isn’t at hard as it looks. Move the paper, not your scissors, and leave about a 1/16” border around the image. This makes the eye see the line of the stamp border and camouflage any mistakes in your cutting 
  • Add dimension to your project with, what else, dimensionals!
  • Reinforce tag holes with a 1/2” circle of coordinating card stock
Did I mention that now through the end of September several patterns of DSP from the Annual Catalog are on sale, including the one I used in this project? A great time to stock up on your favorites!
And there is even more excitement!  The 2019 Holiday Catalog is LIVE!  Stay tuned for lots of projects featuring new product.  And, if you're local, I invite you to my Mega Catalog Launch September 21 at 10:00 am.  Food, prizes, games, Make & Takes, EVERYONE will take home new product!  $30, RSVP by email-ninamac32@hotmail.com, and let me know by September 13.
Looking forward to a fun season where we are blessed by creating, and get to turn around and bless others with our creations!  Love y'all!
Nina
***Click on the links below to order any of the product used  today, or go to my Online Store by clicking the Shop Now button.


Product List