Saturday, February 22, 2020

A Very Special Birthday Card & Double Easel Fancy Fold


Hey Y'all! 
I wanted to share this very special card with you today.  I made it for my "Aunt Madeline" who is really my cousin.  She and my mom are Double First Cousins--sisters married brothers--today is her 100th birthday, and I am getting ready to go party with her, so I've got to get moving!


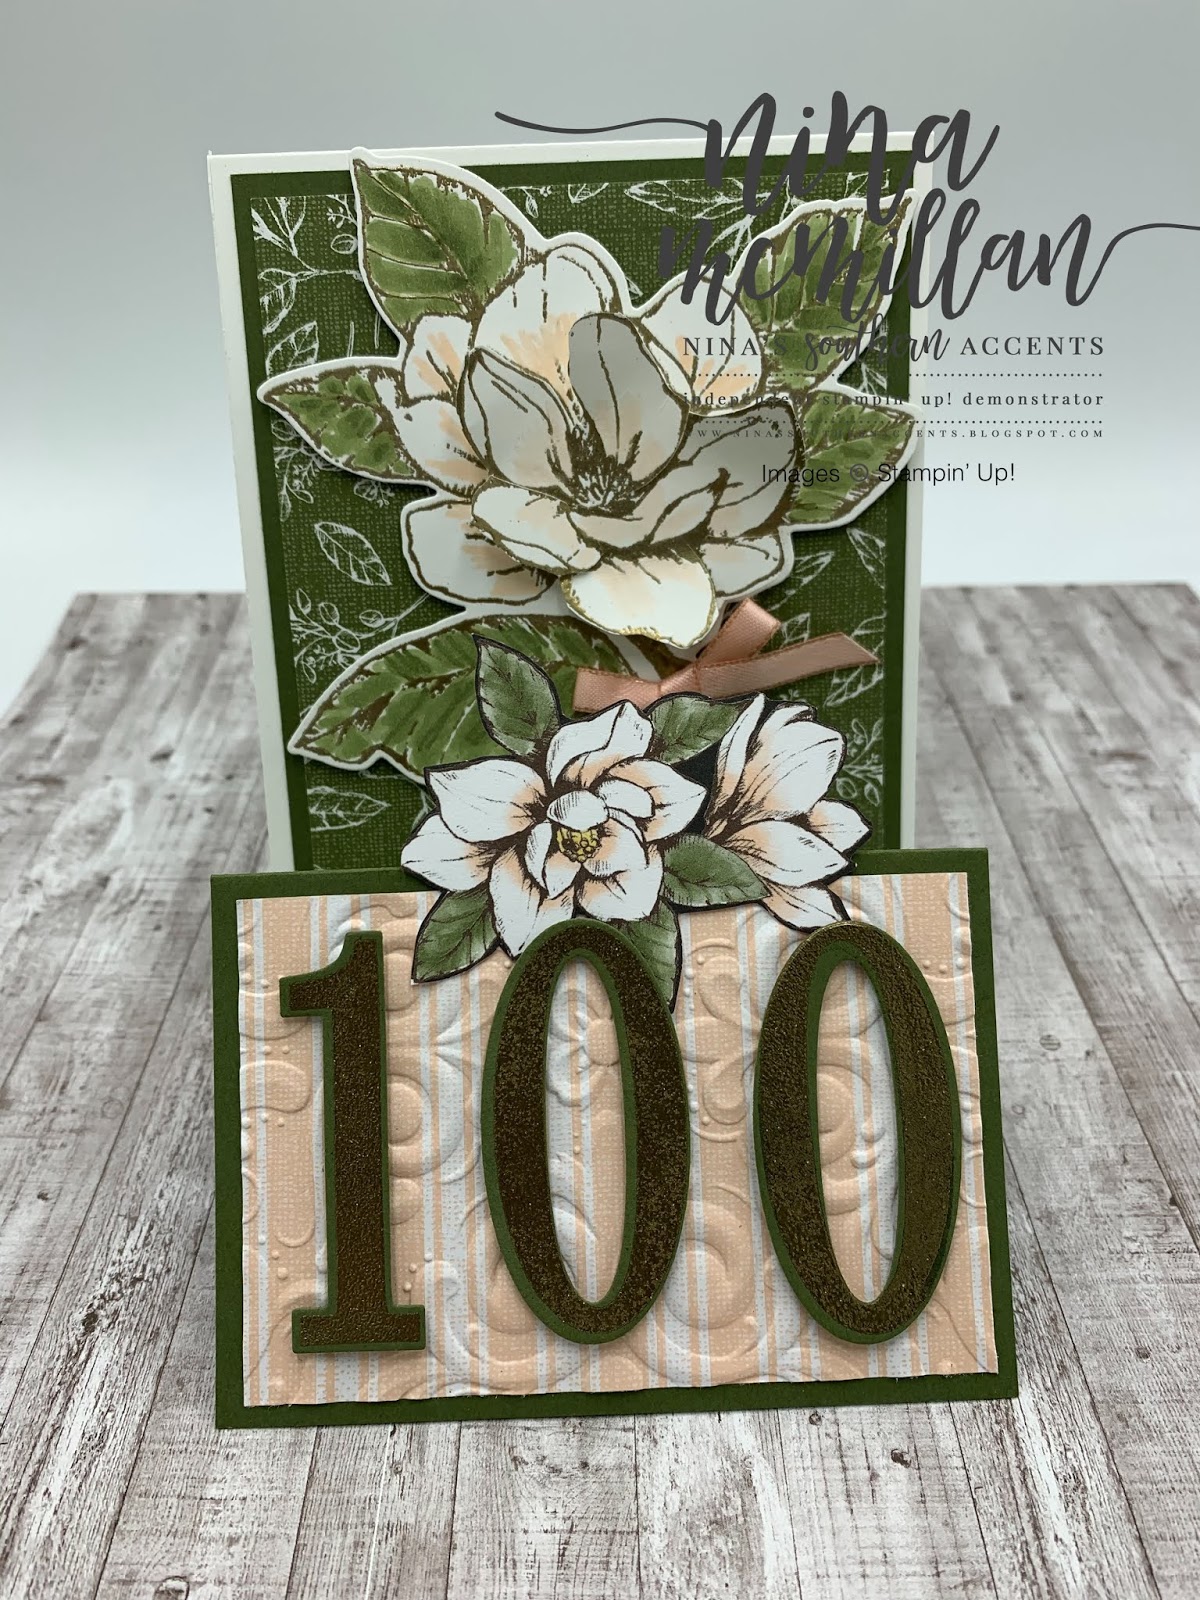
I decided on this Double Easel Fancy Fold to showcase that stunning magnolia...you know us southerners love our magnolias. I followed the measurements from TX Stampin' Sharon (Sharon Armstrong), a fellow demonstrator.  She made a wonderful YouTube video showing how to do one of these.
The fold itself is very easy.  You just start with a top folding card base (4-1/4 x 11, scored at 5-1/2), then add another piece of card stock, I chose Mossy Meadow cut at 4 x 10⁻¹/4, scored at 2-3/4 and 5 on the 10-1/4 side.  You will also need 2 pieces of DSP, one 3-3/4 x 5, and one 3-3/4 x 2-1/2.  These designs were from the Magnolia Lane DSP.


 I dug out a retired set, the Number of Years stamp set and Number framelits and gold embossed the 100 onto Mossy Meadow.  I also gold embossed the large magnolia stamp twice, and cut out the center of one and popped it up on top of the other one to add dimension. I used Stampin' Blends to color the large magnolia.  I also fussy cut a bloom from the DSP to add an accent to the bottom fold.

What is a special card without a special envelope?  I used the Parisian Flourish 3D Embossing folder for the design on the striped DSP, I love how that added to the look!  


And here she is, the lady of the hour!  Happy Birthday Aunt Madge!  I hope you enjoyed your day, you are so loved by so many, and we are so thankful to get to celebrate 100 years of living with you! 
And thank you for stopping by, if you are interested in purchasing any of the products used, just click on the images below to go to my online store.  
Love,
Nina 


Product List

Sunday, February 16, 2020

Let’s Get Hopping Round 28-Shake It Up, Lady!


Hey Y’all!
Welcome to the February 2020 Let's Get Hopping Blog Hop!  Whether you arrived from Teresa Brown's blog, or you are just gettting started, I know you are going to be "All Shook Up!" That is, in a good way!
This month's theme is Shaker Cards, and they can seem intimidating.  But no fear!  I am sure you are going to find some awesome tips and tricks along the way.
I chose to use the Little Ladybug stamp set and coordinating Ladybug Dies, and, I must confess, I am in love!  The stamp set is a Host exclusive stamp set during Saleabration, and you can get details on how to get one at the end of my post.

To make the "bones" of my card, the shaker element, I used the largest rectangle die from the Stitched So Sweetly dies, then chose a Stitched Rectangle Framelit that fit inside to give me the size border I wanted.  Any of our Layering Dies would work to make the frame.  

I then cut the Window Sheet and Balmy Blue cardstock just a smidgen (that's a good Southern word) smaller than the frame.  I used the "loopty-loop" die (well, what do you call it?) to add that cute little stitching for the ladybug's flight pattern.  Before I started adhering everything down, I punched a bunch of 1/2" Basic Black circles and placed them around the edge of my Real Red card base.  
Tip:
I used a piece of Glad Cling Wrap® to pick up the circles after I had placed them.  I then added glue to the back, then placed the Cling Wrap back onto the card base.  Then I cut the overhanging pieces from the edge.
One of the most difficult things about making a shaker card is getting the shaker pieces inside.  My tip for this is to put them all in a pile in the middle of the card base, then place the frame over them.

Another product I highly recommend are Stampin' Up's© Foam Adhesive Strips.  These are perfect to make sure no gaps are left and none of the shaker pieces fall out.  The height they give, though, is equivalent to 2 dimensionals, so the piece of the flower and the sentiment hanging off have mini dimensionals stacked on top of each other.  

I used more of the ladybug stamps to complete the inside of my card.  They are so fun to color with our Stampin' Blends! I also added some Wink of Stella to their wings and the flower for a little subtle "bling."


This is a stamp set you don't want to miss out on.  I already loved the stamp set, but when the coordinating framelits were released this month during the Coordination Product Release, I was ecstatic!  No fussy cutting! Ha!  But my favorite die is the one that makes that stitched loopty-loop.  It would also be great with the Honey Bee stamp set that is available in the 2020 Mini Catalog.


I'm so glad you stopped by today!  The next stop is the very talented Alicia Yap, I can't wait for you to see her creation!

The Little Ladybug stamp set a FREE host exclusive product, meaning the only way to get it is to earn it with a qualifying purchase of $300.  You can get together some friends, have a card party, and combine their orders to help.  I have 2 other ways you can get it.  If you live in the US, and purchase $75 from me during Saleabration (through March 31st) your name will go in a drawing to win one.  You can also join my Saleabration Club.  If you order $150 in February, then another $150 in March, you will get the Little Ladybug stamp set from me, in addition to the host rewards you earn.  If you are interested in ordering any of the products I used, click on the images below to go to my online store.  Remember to use the current host code found in the right column to earn Loyalty Rewards from me.  
Thanks for stopping by! 
Love,
Nina
Product List