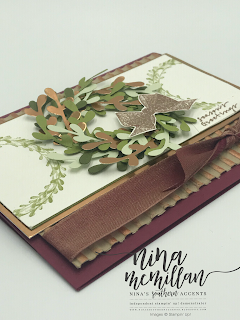
I am so excited to share today's card with you! It is from a stamp set out of the Holiday Catalog, Wishing You Well, and it also used a new punch that you absolutely cannot live without...the Sprig Punch. You need this in your life, I am serious.
I designed the card for this week's Global Design Project challenge. This is the card sketch:
And here is my design:
Do you see that yummy ribbon? The picture does not do it justice!
I am in love! Well, I love anything with copper, but the ribbon is gorgeous. I tied in other copper elements...the gold foil punched with the sprig punch, the copper mat, the copper embossing on the bow and sentiment. And also the Bright Copper Shimmer Paint applied to the dry embossing with a sponge dauber.
I stamped 2 of the wreaths in Pear Pizzazz on either side of my Whisper White piece. To build the wreath, I started with a circle frame I die cut with the Layering Circle Framelits. Then I punched several different colors of green, and attached them to the circle frame. Nothing is "popped up"-no dimensionals believe it or not! All of the texture and layers give this card plenty of dimension. The tiny sentiment from the stamp set was perfect...it doesn't take away from the focal image. I think this card has a "rustic elegance" look with the Corrugated Embossing Folder and the shimmery ribbon.
Tips, Tricks, and Measurements:
- Card Base-Merry Merlot 8-1/2 x 5-1/2, scored at 4-1/4; Crumb Cake 5-1/4 x 4; Copper 2-3/4 x 5-1/2; Whisper White 5-1/4 x 2-5/8
- Use the middle of the copper layer to punch leaves
- The ribbon is tied with a "faux" knot. Attach a piece of ribbon to the back of the card with snail, then tie a shorter piece to the front into a knot. I placed a glue dot underneath the knot to hold it in place. This method doesn't use as much ribbon as wrapping it all the way around the layer and tying.
- Before using the Corrugated Dynamic Impressions Embossing Folder (or any embossing folder that leaves a deep impression), spritz cardstock lightly with water to soften and prevent cracking.
- After embossing the sentiment, I punched it out with the Classic Label Punch, then trimmed the ends at an angle with my snips.
If you like my card, let me know in the comments below! Make sure you subscribe to my blog so you don't miss any inspiration. And if you are interested in ordering any of the supplies used in today's project, please click on the images below to order from my online store. Please use the current host code, it is in the right column. If you do not currently have a Stampin' Up! demonstrator, I would love to earn your business and help with all of your stamping and papercrafting needs. Thanks for stopping by today!
Love,
Nina


No comments:
Post a Comment