Showing posts with label Valentine's Day. Show all posts

Friday, February 4, 2022

Kisses & Hugs-Paper Pumpkin Blog Hop


Hey Y'all!
I am joining the Crafty Collaborators for a Paper Pumpkin Blog Hop featuring January's kit, Kisses & Hugs.  Paper Pumpkin is a monthly subscription craft kit containing supplies to make the projects for that month. It includes a stamp set, ink, embellishments, instructions for the projects, and the very first kit you get has an acrylic block to use with the stamps. Plus, there is a refill kit available if you need more supplies! But here's my secret: I up my subscription to 2 or 3 when I know the projects will be for a holiday like Halloween, Christmas, Valentine's, etc., so I have plenty to share, because those refill kits can sell out fast with popular kits. It is really a party in a box every month. January's kit centers around Valentine's Day, and I am showing 3 alternate projects you can make. 


The first project is a Bag-A-Lope. Those envelopes are just too pretty to only stuff with cards! To make a Bag-A-Lope, score 3 sides of an envelope at 1". Fold and burnish the score lines, then open it up to create a bag. At the bottom of the bag, there will be two triangles created from the score lines. Fold these and secure with adhesive to the bottom. If you want to do any stamping on the envelope, do that before you create the bag. I kept my embellishments simple-this is one of the projects we are making at my Girls Valentines Stamp Camp, and there will be girls ranging from 8 years and up. Of course, you can fancy it up as much as you like.


The second project is this banner I created by cutting apart one of the cards. I punched holes in the top of the hearts to thread the string through. I added some tags created with the Tailor Made Tags dies. I stamped them with the heart and arrow images from the stamp set in Versamark and heat embossed in gold. 
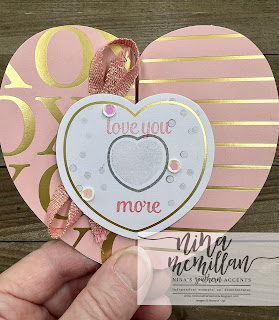

The last project I CASE'd from a fellow demonstrator, Renee Ewart. You can find her on Facebook at Renee's Paper Crafts. I love the sentiments in this stamp. My sweet mama always replied to "I love you" with "Love You More." She signed almost every card she gave me with that phrase, and it brings such sweet memories to my mind.


It is a gate fold card created by adding 2 score lines to the card bases in the kit.


Score a vertical line in the center of both outside hearts of the card bases.


Fold as shown. I added two of the gold embossed hearts, one to the outside and one to the inside. I stamped the outside heart with Smoky Slate and Flirty Flamingo. Make sure you only put adhesive on one side when you are adhering it to the card front, or your card won't open! 
Below, I have included all of the extra supplies I used to make these projects that aren't included in the kit. You can purchase Paper Pumpkin month to month, but right now Saleabration is going on where you can earn free product with qualifying purchases! Why not take advantage and purchase a pre-paid subscription and get free product as well! 

Thanks for joining us today, now you get to see what everyone else is creating!


Live in the US and don't have a current Stampin' Up! Demonstrator? I would love to be your demonstrator! Need a catalog? Email me at ninassouthernaccents@gmail.com with CATALOG REQUEST in the subject line.


WANT TWO FREE STAMP SETS?
Saleabration is a great time to become a demonstrator! The Starter Kit is ALWAYS the best deal in the catalog, but it's even better during Saleabration! Get $125 of products, for only $99, PLUS 2 FREE STAMP SETS OF YOUR CHOICE! I would love for you to join my Southern Accents Stampin' Squad, and no! you don't have to have a Southern Accent lol! Click here to sign up!


Thanks for stopping by today, go make something beautiful!
Love,
Nina


Tuesday, February 1, 2022

Technique Tuesday Blog Hop-Loaded Envelopes


Hey Y'all!
It's another Technique Tuesday, and the Crafty Collaborators are sharing Envelope Techniques.  I had never even heard of a "Loaded Envelope" until about a week ago...I saw a blog post my friend, Tanya Rees, shared of a project she made for her daughter's birthday. I loved it so much and knew it would be perfect to share on this hop.

I am also entering this in the TGIF Challenge #353


What is a "Loaded Envelope?" Basically, it is a package chock full of goodies, tags, candy, whatever you can think of! If you search on Pinterest, you will see all kinds, from simple to fancy. I followed Elizabeth Price's instructions to make the base envelope (you can see it here.) I chose to make mine a Valentine gift and mainly used products from the Sweet Talk Suite, but I did pull in some other stamp sets, punches, embossing folders, and dies.


You can see from the side view there are two pockets, a large one in the back, then a smaller one in the front. Let's take a look at what I put in mine.


"The Wand." As I was doing my research on loaded envelopes, (ok, people, I was looking on Pinterest....research sounded better lol!) I saw that a wand is pretty much mandatory. I created a rosette, then used the Heart punches to decorate the center. I added ribbon and paper curls and made it all fancy.  I found these re-usable straws at Dollar General and used one for my "wand handle." Now, if I could just wave it and my craft room be clean! (It doesn't work, I tried.) I tied ribbon around 3 more of the straws and included those as well.


These cute little holders were perfect for a nail file and pen. Stay tuned....later in the week I will be sharing instructions to make these.


And if you've followed me for any length of time, you know this is one of my favorite things to do...add DSP to the barrel of these Pentech pens. 


I created this gift card pocket by folding a 6x6 piece of DSP in 1/2, then folding back the front corner. The tag was created with a Stitched So Sweetly die and Label Me Lovely Punch. The sentiment, "Treat Yourself," came from the Sweet Ice Cream stamp. We have a new ice cream shop in town, so I will be getting a gift card from there and attaching it to the back of the tag.


What is a gift without chocolate? This candy bar pull is an oldie but goodie. The wrap is one of the Ombre Gift Bags I embellished and folded around the candy bar, then secured it with a belly band.


I also made a simple bookmark with the Delightful Tag Topper Punch and Detailed Trio Punch (to round the bottome corners.) Cardstock measures 2 x 5-1/2, DSP measure 1-3/4 x 5.


A slimline card was the perfect size to include with all of the other gifts. I am so excited about the new slimline dies and envelopes! The cardbase is 8-1/2 x 7, score the 7" side at 3-1/2. The DSP is 8-1/4 x 3-1/4, and I cropped it with one of the Slimline dies. I punched hearts, then used different embossing folders to add texture to every other one. I stamped the sentiment in Real Red (it is from the Celebrate Sunflowers stamp,) added ribbon behind the heart, and popped it up with a dimensional. To finish off the card, I added 3 of the Polished Dots under the sentiment. To add interest to the envelope, I added a strip of DSP to the flap and fussy cut around the edge. 
Now that I've introduced you to the "Loaded Envelope," (or had you heard of them?) it's time to see all of the other great techniques everyone is sharing!


Live in the US and don't have a current Stampin' Up! Demonstrator? I would love to be your demonstrator! Need a catalog? Email me at ninassouthernaccents@gmail.com with CATALOG REQUEST in the subject line.


WANT TWO FREE STAMP SETS?
Saleabration is a great time to become a demonstrator! The Starter Kit is ALWAYS the best deal in the catalog, but it's even better during Saleabration! Get $125 of products, for only $99, PLUS 2 FREE STAMP SETS OF YOUR CHOICE! I would love for you to join my Southern Accents Stampin' Squad, and no! you don't have to have a Southern Accent lol! Click here to sign up!


Free Gift for Every order in january
Crafty Collaborators Tutorial Bundle with project ideas from demonstrators all over the globe!
For today's blog, I did not list all of the products I used because there were so many different stamp sets and other tools I pulled in. If you have any questions, though, about what I used, please contact me and I will be glad to share! 


Thanks for stopping by today, go make something beautiful!
Love,
Nina


Monday, January 24, 2022

Valentine's Day Blog Hop


Hey Y'all!
Hope you are feelin' the love on this Monday! The Crafty Collaborator's sure are sharing it! Today it's all about Valentine's Day, and we are sharing projects that will inspire you to make some beautiful creations to give to your loved ones.


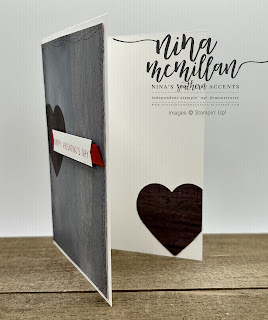
My card was inspired from those videos that pop up in your Facebook feed-this one was a crafter painting a framed home decor piece. I thought, "That would be a neat card!"


This look is created with Whisper White Craft Ink and a Blending Brush on a piece of In Good Taste DSP. Here are the steps:
  • Use the Heart punch to punch a sticky note to create a mask. Punch near the top getting as much of the "sticky" as possible
  • Place the sticky note heart on a 4 x 5-1/4 piece of In Good Taste DSP in the area you want to mask. The darker the "wood" the more contrast you will have
  • Use a Blending Brush to blend the Craft ink all over the paper, being careful not to go under the edges of the mask.
  • Once you have the desired coverage, remove the mask
  • Run the DSP through the Cut & Emboss machine with the largest Stitched With Whimsy Die
  • Stamp the "Happy Valentine's Day" greeting in Real Red ink onto a 1/2" strip of Basic White
  • Use the Banners Pick A Punch to banner the edges
  • Use Stampin Seal+ to adhere a strip of Real Red Faux Linen Ribbon to the sentiment strip.
  • Adhere the DSP panel to a Basic White Thick cardbase (8-1/2 x 5-1/2, scored at 4-1/4)
  • Place Stampin' Dimensionals (I used the Mini's) on the back of the sentiment strip and adhere to card front


Of course, I had to add a punched heart to the inside!
Now it's time to see everyone else's creations!


Live in the US and don't have a current Stampin' Up! Demonstrator? I would love to be your demonstrator! Need a catalog? Email me at ninassouthernaccents@gmail.com with CATALOG REQUEST in the subject line.


WANT TWO FREE STAMP SETS?
Saleabration is a great time to become a demonstrator! The Starter Kit is ALWAYS the best deal in the catalog, but it's even better during Saleabration! Get $125 of products, for only $99, PLUS 2 FREE STAMP SETS OF YOUR CHOICE! I would love for you to join my Southern Accents Stampin' Squad, and no! you don't have to have a Southern Accent lol! Click here to sign up!


Thanks for stopping by today, go make something beautiful!
Love,
Nina