Hi Everyone!
I am excited to be hopping again with the Let's Get Hopping crew! You may have arrived at my blog from the awesomely creative Tanya Rees. I know you have seen some fabulous creations along the way! If you are just starting here, make sure you click on the links to carry you all the way through the hop so you can see all of the wonderful projects everyone has in store.
.
Today, I am focusing on birthday cards. I am ashamed to admit that I am TERRIBLE about sending birthday cards! I don't know about you, but birthdays sneak up on me. It is the day of someone's birthday and I haven't even thought about sending them a card! So one of my New Year's goals is to send more birthday cards. In order to do that, I need some cards in my stash, so this challenge was perfect!
The challenge was to make 2 different cards using the same sketch, one for “him” and one for “her”. My sketch was pretty simple, 8 1/2" x 5 1/2" card base, scored at 4 1/4", a 4" x 5 1/4" embossed with an embossing folder, then layering a stamped piece over a coordinating shape in colored cardstock, with ribbon embellishments.
For my guy card, I chose a new stamp set from the 2018 Stampin’ Up! Occasions catalog called “Waterfront”. This set was designed by one of the Million Dollar Achievers, Connie Heisey, and is a beautiful set with a ton of possibilities. I love the sentiments in the set as well, although I didn't use them on this card. I embellished with the Copper Trim, and just a scrap piece of burlap I had in my stash. (The burlap is the only thing that is not a Stampin' Up! product.) I stamped the inside of the card with the Stylized Birthday stamp. I stuck with masculine colors, blues, greens, browns, stamped my scene (and yes, that is stamps only!) then cut it out with one of the Layering Oval Framelets.
TIP: When adding ribbon to a card, apply fast fuse to paper, then lay down ribbon.
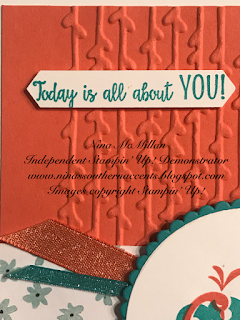
I used some Sale-a-bration items on my card for my lady card. The Beautiful Peacock Stamp set and the Shimmer Ribbon are two of the free items you can earn when you purchase $50 worth of Stampin’ Up! product through March 31. I also used one of the new embossing folders in the new Occasions Catalog--Petal Pair and you get two of them! I also changed the orientation of the card base from landscape to portrait.

My color palette for this card was inspired by the ribbon. I added a piece of DSP from the Whole Lot of Lovely collection, measuring 4"x5 1/4". I also added a sentiment from the stamp set, and used a scalloped circle for the layering piece instead of a plain one like I used for the masculine card. A note about the shimmer ribbon: It is 3 different widths! I didn't notice it in the catalog, but wanted to make you aware of this if you plan to order any. It is beautiful ribbon!
Here is a photo showing the different widths.
If you would like to order any of the products used, click on the links below, and it will take you to my online store. I am excited to see what Eimear Carvill has in store for us today, I know you will love it! Click on the link to take you to her blog. Leave a comment below and let me know how you like the cards! What are your favorite colors to use for Gents and Ladies?
I have to give a Shout Out to Jane Lee with Fancy That Jane for my new logo! What do you think? She is wonderful and I recommend her for any blog design needs you may have. Just click on her logo to the left and it will take you to her blog
If you live in the United States, and do not have a Stampin' Up! Demonstrator, I would love to be your demonstrator. I hope you will subscribe to my blog, and follow me on Facebook, Instagram, and Pinterest.
Thanks for stopping by!
Nina
> Product List


Nina, love your new blog, Beautiful cards, especially the His card with the Waterfront stamp, I do not own this stamp but have seen so many beautiful cards created with it. Thank you for sharing your creativity!
ReplyDeleteThanks Tracy! There are some amazing creations done with this set, it is so much fun to play with!
DeleteGorgeous cards Nina, very clever changing the orientation of the cards from landscape to portrait while keeping the same sketch. Love the new blog design too
ReplyDeleteThank you Tan!
DeleteTwo wonder fly textured birthday cards! Great tip on using fast fuse to add ribbon to your cards. I especially love the burlap in the background on the blue card.
ReplyDeleteMaria
I love the look and texture of burlap! Thank you Maria!
DeleteFresh new blog header - it's gorgeous Nina, and so are your projects! Thanks for sharing. Now mail those out already lol..
ReplyDeleteThanks Jen! It's not anyone's birthday yet, but I am prepared!! lol!
ReplyDeleteLovely cards Nina. Great new header 😉 thanks for sharing!
ReplyDeleteI'm just like you with Birthday cards, you'd think as cardmakers we'd be more prepared!!! Love your cards today especially the Waterfront male card
ReplyDeleteLove these cards!!!
ReplyDeleteOh I love your Waterfront card. I seem to be liking all of the Male cards on this hop and this one is of no exception. Wonderful inspiration ... thank you x
ReplyDeleteTwo amazing cards that I will no doubt have to case. And btw... I, too, have a hard time sending out birthday cards on time. You're not alone. LOL!
ReplyDeleteAnd a shout out to the talented Fancy that Jane - great job on the blog header!!