Sunday, November 17, 2019

Fun with Fun Folds and Interactive Cards-Let's Get Hopping Round 26

Hey Y'all!
I am so excited about hopping with the Let's Get Hopping crew this month!  We have a fun challenge-a Fun Fold or Interactive card!  Tanya Rees was the stop before me, if you arrived here from her site, Welcome! Make sure to hop along and see all of the neat projects from this talented group of ladies.  
Now, this card is not for the faint of heart!  There were alot of steps involved, but that's the fun of creating, right?

I chose to make a Z-fold Wiper Card, not only for this challenge, but this is also my card for a Fancy-Fold swap I am participating in at Onstage Atlanta.  I made 21 of these babies!  I'm not sure if I had a moment of insanity when I signed up for that....Lol!

Do you see that sweet little elf popping up?  I did a video tutorial showing you the nuts and bolts of making a wiper card.  You would be reading for days if I tried to write it all out in my blog!  So be sure to check out the video, I have it linked below.
Here is the back of the card with room to write your message.

I think the funnest part of this card was making that whipped cream on top of the mug with the Snowfall Accents Puff Paint...just punch a piece of whisper white with the Pretty Label Punch, cut it in half, and coat with the puff paint (thanks Tracy Bish for that awesome tip!) I added Puff Paint to the elf as well.
I embossed the red mug with the Winter Knit 3D Embossing Folder and added the Snowflake die from the Seasonal Layers dies.  I also embossed the striped DSP with the Brick and Mortar 3D Embossing Folder.
Here is the link for the YouTube video showing you how to make the Wiper Card.


Tips and Tricks:
  • Card Measurements: Card Base Pool Party 8-1/2 x 4-1/4 & 8-1/2 x 2-1/4 (both scored at 5-1/2 & 7), Whisper White 4 x 5-1/4, DSP (2) 2 x 5-1/4, (4) 2 x 1-1/4
  • Score the cardstock first, then cut.  You can get 2 of the larger pieces and 1 smaller piece from 1 sheet of cardstock if you are making multiples
  • Puff Paint is very runny, you hardly even have to squeeze the bottle. Get it started on your Silicon Craft Sheet before applying to your project for small areas


Product List

Sunday, November 3, 2019

Stampin’ In High Cotton

Hey Y'all!
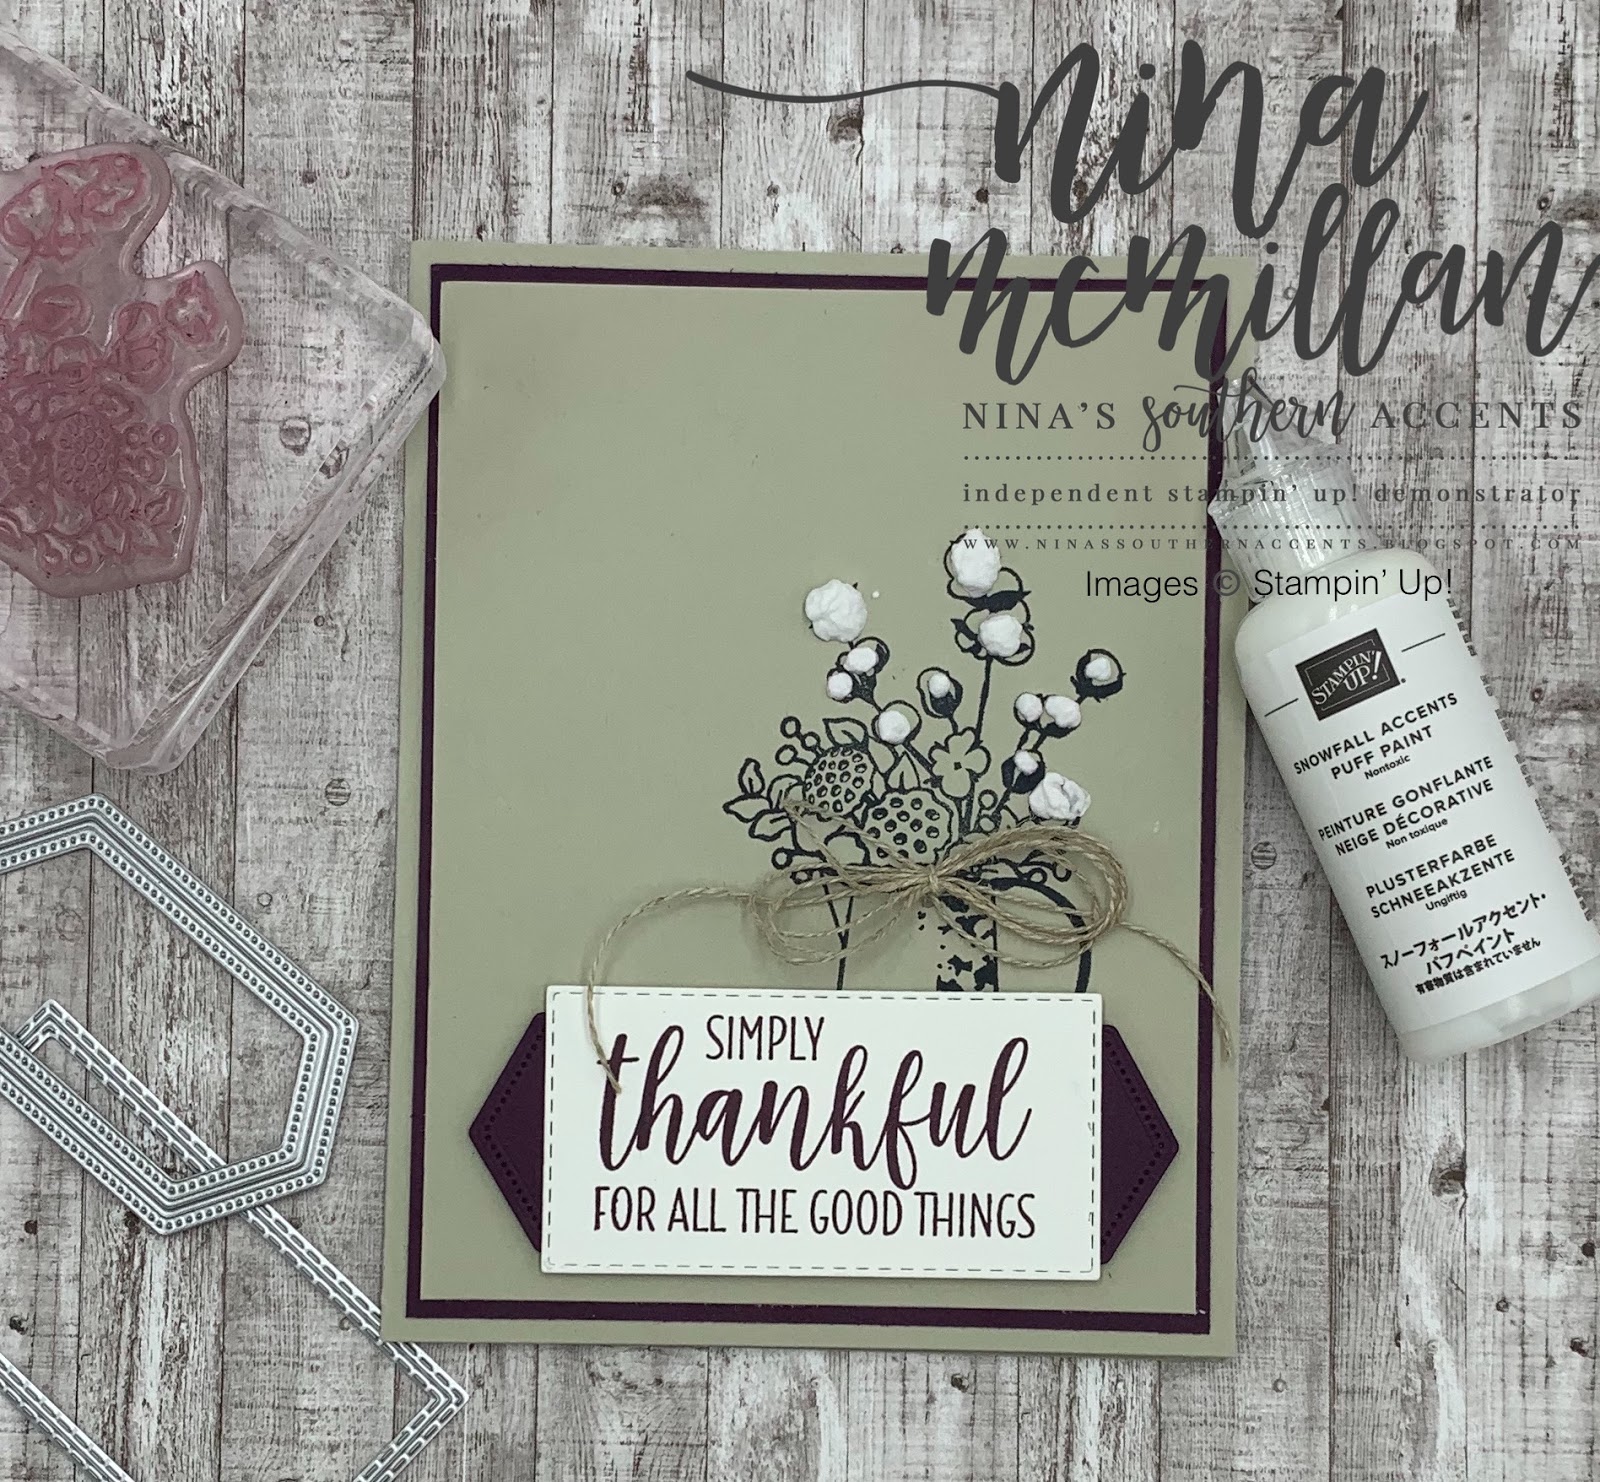
In the South, there is a saying, "Walking In High Cotton"; in fact, the Country Band Alabama had a song about that.  It means that your life is good, or you are successful.  Well, this card makes me feel that way!  If you have listened to my FB lives, or been to any of my events, then you know I am absolutely in love with the Snowfall Accents Puff Paint.  But, as you can see from this card, it's not just for snow...
Several weeks ago on a FB live, I used this stamp from Country Home and showed the technique of using it for the cotton bolls for a 3D look.  I finally had a chance to make a card with the idea, and this is what I came up with.
I needed a Thank You card from some special friends, and I knew this set would be perfect.  I kept the image simple, I wanted the focus to be on the cotton.  

I carried the image over to the inside of the card, stamped in Sahara Sand (stamped off first for a lighter color) then the sentiment stamped over it.  

I used the Stitched Rectangle and Stitched Nested Label Dies for my sentiment, and a Linen Thread Bow finishes it off.

Tips and Tricks:
  • Card Measurements: Sahara Sand Card Base 8-1\2 x 5-1/2, scored at 4-1/4, Blackberry Bliss layer 4 x 5-1/4, Sahara Sand layer 3-7/8 x 5-1/8, Whisper White inside layer 4 x 5-1/4
  • To save cardstock, cut dies or punches from the layer that is covered up.  Here, I cut the Stitched Nested Label from the Blackberry Bliss layer.  
  • I cut the Blackberry Bliss label in 1/2 to "stretch" it.
  • The Puff Paint is very thin and runny, you barely have to squeeze the bottle.  For the cotton, I just touched the tip to the paper.  Practice on a scrap before putting on your project.
  • I used Memento Tuxedo Black to stamp my image.  If you use Stampin' Up!'s Classic Ink Pads, the color will transefer to the Puff Paint, which can give a different look, but not one I wanted on this card.
  • You must heat the Puff Paint with a Heat Tool to make it puff.
Thanks for stopping by today!  If you would like to purchase any products used today and do not already have a Stampin' Up! Demonstrator, simply click on the links below to go to my online store.  I would love to earn your business, and I have a Loyalty Rewards Card that you can earn free products with your purchases.  Click on the Loyalty Rewards tab above to see the details.  If you love Stampin' Up! products, consider signing up!  The Starter Kit is the best deal in the catalog.  I would love to have you join my Southern Accents Stampin' Squad.
I hope you are Stampin' in High Cotton, too!
Love,
Nina


Product List