Sunday, October 18, 2020

One For The Boys: LGH 36


Hey Y’all!

It's time for another fun blog hop with the Let's Get Hopping crew. If you arrived here from Rachael Merrick's page, Welcome! This is her first time hopping with us, isn't she fabulous?  Our theme this month is "One For The Boys." Do you cringe when someone says "masculine card?" Why are they so difficult?  It seems like a struggle for all stampers, but I hope you come away with lots of ideas after hopping with us today.

When I think of Masculine Cards, I think of neutral colors, browns, blues, and the guys in my life are outdoorsmen, so usually some type of nature scene.  But sometimes those neutral colors can be drab and boring, and I wanted my projects to have a little brightness to them.  So here is what I came up with.

I have 2 projects to share, both using one of my favorite stamp sets, Rooted In Nature.   If you struggle with masculine cards, this is the set for you! 


I paired it with the In Good Taste Designer Series Paper, which is one of the DSP's on sale all month long!


On the first card, I did a watercolor wash with Crushed Curry, Pumpkin Pie, and Old Olive on a piece of Shimmery White CS, then, after it had dried, stamped it with the Birch Background and some of the leaf images in Gray Granite. 


I did another wash in those colors on another piece of Shimmery white, stamped the leaves with Gray Granite, and then die cut them.  


For the second card, I used a 4 x 5-1/4 piece of  DSP, and stamped one of the leaf images directly onto it.  I did the same watercolor wash technique with the leaves.  


To get the brown spots, I inked up my water painter with Soft Suede reinker, then tapped it against the cap. Don't they look realistic?  
Thank you for stopping by today, next up is the fabulous Eimear Carvill, just click on the arrow to head over to her page.


Thanks for stopping by!  If you live in the US and don't already have a Stampin' Up! demonstrator, I would love to earn your business. If you would like to order any of the products I've used today, click on the images below to go to my online store.  Be sure to subscribe to my blog so you don't miss any of the fun!
Love,
Nina

Be sure to take advantage of the DSP sale going on this month!


Product List

Thursday, October 15, 2020

Trimming The Town Blog Hop


Hey Y’all!

It's always so much fun to be a part of a blog hop with stampin' friends from all over the globe! Today's hop is all about the Trimming The Town suite.  I chose to focus on the Designer Series Paper. 


My first card is a slimline card, and there is no stamping involved.  That's right, the scene came just from fussy cutting the DSP.  Now the dies in the suite will cut some of the images, but since I don't have them yet, I broke out my snips and cut away!

I used dimensionals on some of the elements, and even my greeting came from the DSP.  I die cut some of the paper with one of the Stitched Rectangles and added some Real Red Braided Linen Trim.  Slimline cards will fit in a business-size envelope.


This next card is a "Mini" Slimline Card.  The inspiration for this card and envelope, and the measurements, came from Debbie Mason.  


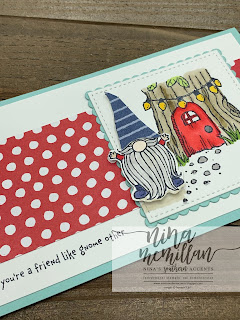
I wanted to show that the paper can be used for more than Christmas, and I am just in love with the Gnome For the Holidays stamp set.  I purposely made this to be used for any occasion.  You could stamp a birthday greeting on the inside, or a thinking of you or get well sentiment.  I used a scrap of the DSP and paper pieced the hat.


Since the card doesn't have the usual measurements, you can create a custom envelope.  


Here is a template of the envelope with the adhesive placement shown.  

Card Measurements:
  • Slimline Card: Cardbase 8 x 7, score on 7" side at 3-1/2, DSP 7-3/4 x appx 3 (I cut the bottom on a curve to look like a snow bank, and adhered a piece of Whisper White at the bottom that measured 7-3/4 x 1-1/2)
  • Mini Slimline Card: Cardbase 6 x 7, score on 7" side at 3-1/2, WW layer 5-3/4 x 3-1/4, DSP 2 x 5-3/4
  • Mini Slimline Envelope: 8-1/2 x 8, score on 8-1/2" side at 2-1/4 & 6-1/4, score on 8" side at 1/2 & 6-3/4.  Remove corners as shown in template, round corners of larger flap. Add DSP to large flap, stamp front of envelope, add adhesive and put together.
Thanks for stopping by today, be sure to visit all of the blogs so you don't miss any inspiration! 

If you live in the US, do not have a Stampin' Up! Demonstrator, and would like to order any of the products I've used, click on the images below to go to my online store. Please use the current host code found in the right column to earn rewards from me.  See you next time!

Love, 

Nina

Product List