Hey Y’all!
I am so excited to be hopping again with my friends that are part of the Let's Get Hopping crew. If you have been hopping with us, you arrived here from Mikaela Titheredge's blog. If you are starting with me, be sure to hop all the way through...I know you will get some great ideas and inspiration for your own projects.
Our challenge this month was to create projects that share positivity and uplifting thoughts.
With everything going on in the world with the COVID-19 virus, we all could use some positivity and lifting up! I wanted to make something that showed appreciation to those on the front lines. This could be doctors, nurses, law enforcement, etc. I even thought about teachers whose school year had been cut short, and they were having to teach online instead of face to face.
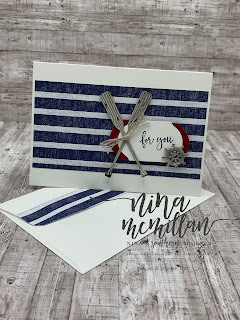
I used the Baker Boxes from Stampin' Up! to package my homemade White Chocolate Cranberry cookies in. I wrapped it with a belly-band made from the Come Sail Away DSP, then layered 2 oval die cuts and stamped my sentiment onto a Stitched Nested Label die cut. The sentiment in the By the Dock stamp set was perfect. The stamp says "Thank you for making a difference in my life." I didn't want to include "in my life," so I used my Stamparatus and Stampin' Write markers and colored only the words I needed. The Stamparatus allowed me to stamp multiple times in case the image was too light or I missed a spot.
I die cut the paddles from the coordinating dies and added some Braided Linen Trim and a wheel from the Sail Away Trinkets. I applied Early Espresso ink to the paddle dies by pressing the die into the ink pad (you may want to wear gloves to keep ink off of your fingers.)
And, of course, there has to be a matching card, right? The Notecards and Envelopes let you make quick and easy cards...keep some in your stash! Did I mention there are cookies?
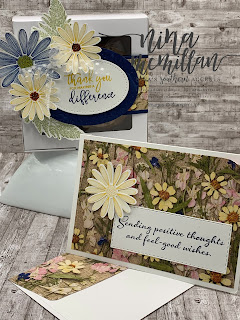
I made a more feminine version using the Pressed Petals Specialty DSP and the Daisy Lane stamp set and Daisy punches. (There are 2 punches, the Daisy punch and the Medium Daisy Punch, and both coordinate with the stamp set.)
This DSP is thinner than normal, so I attached it to some Night Of Navy cardstock to make it more sturdy.
This time, I used two different colored markers for my sentiment.
And here is the matching card.
The Baker's Boxes are food safe, but if you don't want to give food, they would be perfect for other items, such as giving someone those homemade masks all of you talented seamstresses have been making! Other ideas are a bottle of hand sanitizer, some bath bombs, lotion, the possibilities are endless. But when in doubt, cookies are always a good idea! I am going to make several more of these to share with some nurses and teachers that I go to church with. What would you put in them and who would you give one to? Let me know in the comments!

Hey, did I tell y'all about the cookies! I am so excited about these cookies...it's been awhile since I made homemade cookies from scratch. Cookies make me pretty happy, so I'm counting on them to share that positivity! The recipe is below if you would like it. Just remember if you decide to make them, eating raw cookie dough is not recommended, not that anyone would ever entertain that thought....especially not me.....Meanwhile, you need to hop on over to Alicia Yap and see what she has to share today. Y'all let me know if she has cookies!
Thanks for stopping by today! I hope I have inspired you to find ways to encourage others as we go through this pandemic. Times like this will do 2 things...it will bring out the best in people, or it will bring out the worst. So I'm going to leave you with this:
Stay safe and well my friends! Be sure to subscribe to my blog so you don't miss out on the fun!
Love,
Nina
White Chocolate Cranberry Cookies
1/2 C granulated sugar
3/4 C sweetened dried cranberries
1/2 C White Chocolate morsels
3/4 C packed brown sugar
1-1/2 C all-purpose flour
1/2 tsp baking powder
1/2 tsp baking soda
1/4 tsp salt
1 C quick or old-fashioned oats
1/2 C pecan or walnut halves, chopped
Mix above ingredients together
3/4 C butter or margarine (1-1/2 sticks) softened
2 eggs
1 tsp vanilla extract
Preheat oven to 375 degrees F. Combine butter, eggs, and vanilla; mix until well blended. Add dry ingredients, mix until well blended. Use cookie scoop or spoon to drop onto cookie sheet. Bake 13-15 minutes or until edges are golden brown. Cool 5 minutes, then place on cooling rack.
I used a boo-coodle (that's a good Southern word!) of products today. And that is why I am a Stampin' Up! Demonstrator...I want it ALL! Contrary to what my husband thinks, I don't have it all..yet..but I have cookies...I digress. If you are like me and want it all, why not become a demonstrator and buy from yourself at a discount! I would love for you to join my team-the Southern Accents Stamping Squad-SASS for short. The Starter Kit is the best deal in the catalog! Here are the products I used...
Just click on the image to go to my online store.
Product List


